Now that the image has been transferred to the timber we can start on the actual pyrography. But first we will need to consider the type of point we will use to carry out the various stages of the work.
I have used the original nib that came already attached to a Razor Tip pyrography pen that I recently bought as a second pen. I bought it to provide the convenience of not having to change nibs too often. I typically only use one or two nibs for my pyrography work and the one I use most, is one I have shaped from the wire they supply for making your own nibs. This nib is shaped to accomplish as many different tasks as possible and to avoid having to frequently change nibs.
For this exercise I have chosen to use the supplied nib and not my usual one as it is more likely to be the same as something you already have. At a later date I will demonstrate how I alter nibs to suit my own preferences, if it seems the information would be useful to anyone.
There is one small modification, if you can call it that, which we should make to the nib and should do from time to time as work progresses. That modification is to polish all the area of the nib that we might be using on the timber. To do this I have a small piece of MDF with a little fine abrasive compound rubbed on, something like rouge would do. It just requires the nib to be polished on this until a bright smooth surface shows, a quick wipe on a tissue or rag and the nib is in prime condition to do its work. From time to time a quick touch-up will keep it that way.
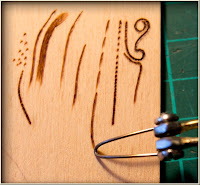
Now before the actual work begins on the project I always like to test the nib's temperature on a scrap piece of timber and I often do a fair bit of 'doodling' and experimenting with the mark making possibilities of the pyrography tool before I commence a new project. This is often time well spent finding out what the tools can do and what you can do with the tools.
Now onto this actual project, select a very low temperature that will barely make any impression on the timber and increase this by tiny amounts until you can easily make a good dark line, with no blobbing – slowly – on your scrap test piece. When you have this working just the way you want, you can start 'drawing' over the transferred line on your timber or board.
Start with the lines of the outside border first and try to produce a good black consistent line with the thinest edge of the nib. Do this by using short overlapping strokes building up the darkness of the line as you go, just gliding in from above the work surface touching the surface with just a little pressure and then gliding off the surface again. The short strokes can be as short as dots if need be and increased to longer strokes as you gain confidence. Practice this on your scrap piece if you need to, but don't worry about speed, concentrate on the quality of the line.
The quality that you are after in the line is a good dark tone and a fairly consistent thickness. You will notice that the lines in the pattern are not straight, as if they'd been done with a ruler but they undulate very slightly and there is even the odd deliberate kink in the line work, pyrography lends itself well to this particular style. Deliberate and confident but nevertheless lively and 'organic' is the aim as you draw over the lines. Have a look and study the work of illustrators like Arthur Rackham and Heath Robinson and see how much is conveyed by the line-work alone.
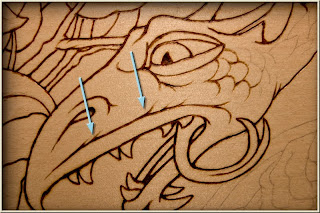
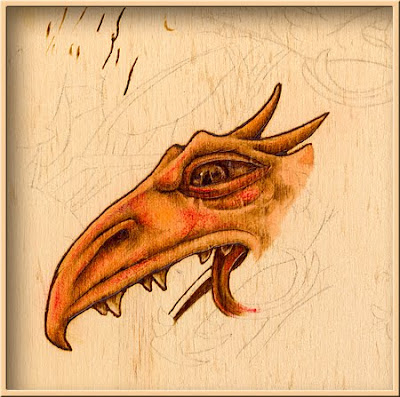
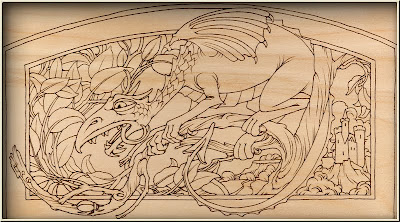
See how the line bounding the top of the upper lip of the dragon is actually composed of a number of lines, each flicking off in arcs to suggest a curved surface above it. In all such instances render individual lines carefully and deliberately letting their sum total come about of its own accord. It is the character of the lines that you draw in a line drawing that enables more to be conveyed to the viewer than just a boundary, the line can suggest and insinuate what lies above it and below it. It can begin to show the topology of adjoining surfaces like tonal shading can in a more tonal drawing. So whenever you draw a line try to have an awareness of what your drawing is indicating about every thing outside the line you've drawn. Think out side the lines.
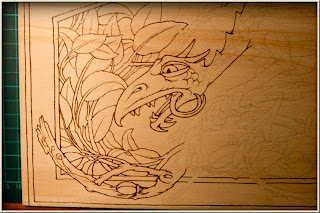
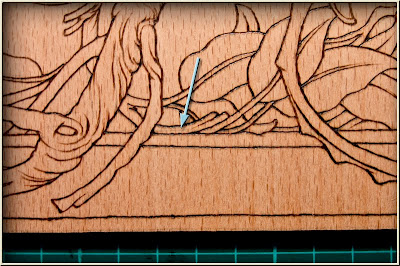
This picture will depend a lot on the line work involved and so as we progress it will be the focus of much of our attention. After all the straight parts of the border lines have been completed we can turn our attention to the the rest of the work, noticing how the lines relate to one another, how lines join other lines, how the convergence of one set of lines relates to another set of converging lines.
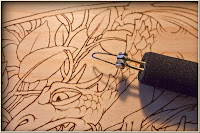
I'm trying to show in the photo above where it might be best to begin and end the lines you are drawing in order to keep the relationships of the lines to one another.
An increasing awareness of how the line-work functions in a line drawing will enable you to make more and more shrewd choices as to how you will render over the pencil lines already there. It will also enable you to make useful changes and corrections to your pencil tracing and even to the original design as you progress. I found myself making small additions and corrections as I went, I can't say what they were because there were many of them and they were small changes.
One change that I will point out was where I deviated a little from the path drawing the border, the problem began due to inattention and the line I was drawing began to head in a direction away from the horizontal line I was supposed to be following. There was no way to erase as much work as I'd need to to fix this and an abrupt jump back to the proper path would destroy the integrity of the whole line so the only option was to gradually return to the original path over some distance. This is usually the best option when you start to go off course.
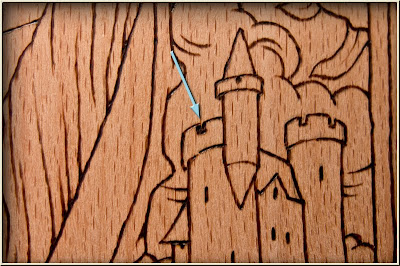
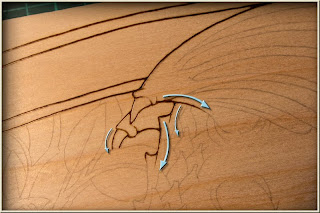
On the subject of erasure, it can be done, even extensively if there is sufficient thickness of timber. It can be done by scraping with an extremely sharp blade and or sanding the surface. The veneer on the working surface of my board was extremely thin however and when this is the case the options are less. Small blobs and small errant lines can be removed with careful scraping and I have shown this in one of the battlements on the castle.
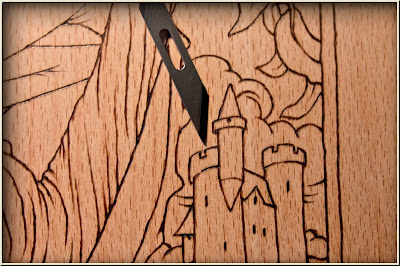
Here you can see where a small erasure has been successfully made with a small blade to scrape away the unwanted bits.
As you continue to render the work onto your board remember to turn your board often to get the most comfortable hand position to draw your lines, keep the ball of your hand on the inside of all curves and devise strategies as you go to draw the lines in an order that will maintain their relationships as you draw them.
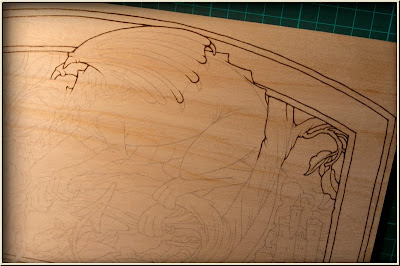
I am showing two versions of our project here one on European Beech ply and one on Kauri Ply to display the different effects that show on the different timbers. The Kauri is probably most like the timber you will be using if you are in our region of the world (Australia).
 Kauri
Kauri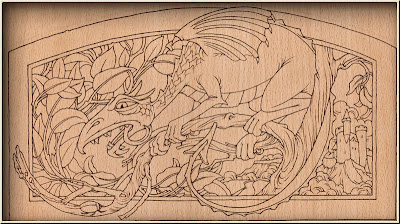
European Beech
In the next post we will be moving to adding the colour and tone to our project. As this approach, adding colour will be new to me as well I've experimented on some scrap to give some idea of were we will be headed with the final rendering. The process will have stages and therefore options as to the final however. So take your time and above all enjoy your work.