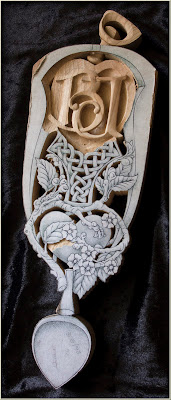
I have now continued with carving the front the celtic knot section and some more of the cherry branch above the cherry branch cage. I will have to decide on the thickness and three dimensional form of this section as I approach work on the back of the spoon.
Likewise it will be necessary to make a number of other decisions about where the connecting parts of the cherry branch that form the cage will be located, as carving proceeds. This is always an intuitive process and involves sketching in in ideas on the carving and sometimes taking up the suggestions that occur from those incidental forms that occur as waste is removed.
Whereas the shallow depth of timber to carve, was a problem with the stems and leaves forming the front surface of the cage, the massive thickness of the other leaf shapes poses the opposite problem, where a delicate look needs to be presented from each view but something believable and different in shape has to be indicated on the other side.
Every now and then I will return to tidy up the hollowed-bowl area behind the initials to get nice fair curves where the forms intersect. It is a good idea to swing the light source into various oblique positions from time to time to get a raking light that will show the true nature of the forms viewed from a variety of angles. This will also show up any unattractive surface irregularities that need to be gently carved away.
Here is an account of the rough method I use to make the small chisels from piano wire.
I use various thicknesses of piano or music wire to make the tools. The one and a half millimetre size seems to be the most useful diameter. The wire is worked cold, on a small anvil (any reasonable steel surface), with a ball-pane hammer. this produces a fishtail shape and has the added advantage of work hardening what will be the cutting edge of the chisel.
The result of all this hammering will be a ragged fishtail shaped end on the wire, I have made no attempt to be neat with my hammering here.
The ragged edge can then be gently ground away or sanded away to a straight, skewed or rounded edge. I prefer a rounded edge as this way the chisel functions as a gouge.
It is a little more difficult to grind or sand a cutting edge on the curved shape but it is worth the effort. Straight chisels are still useful though.
I use wet and dry sand paper to 'grind' the cutting edge on the tool as it doesn't take long at this size and there is then no risk of drawing the temper on the tool.

The next step is to use increasingly finer grits to hone the edge and finally polish with stropping compound. The whole process is very easy, very cheap and you can therefore afford to experiment with different shapes and you can bend the wire into a variety of cranked patterns.
Small allen keys can also be used to make miniature chisels. However the hammering will not work as these tools are already hardened. Allen Keys cannot be bent safely either, as they will snap and flying pieces can endanger you. To break off the right-angled section use two pair of pliers and take the precaution of covering the whole operation with a cloth to stop any flying bits.
The small chisel from an allen key will make a good miniature mortise chisel.


