Whimsical Wood Blog Pages

Home Page www.whimsicalwood.com

This blog features the current woodcraft, Art and Graphic work of David Stanley.

Thursday, March 1, 2012

"What you doing Grandad?"'


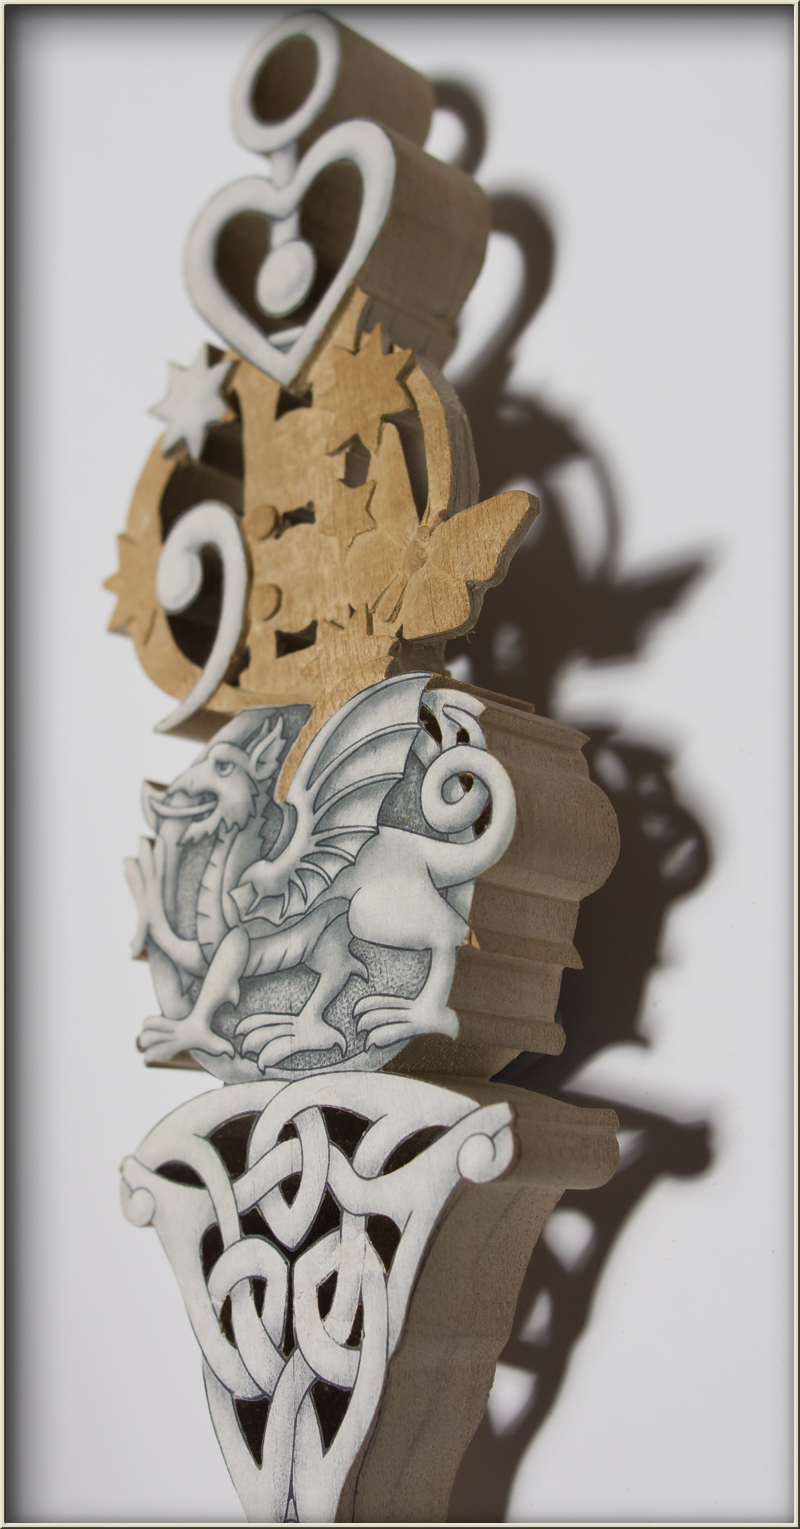
My grand daughters survey work on the current lovespoon. They've identified some things on the spoon they recognise; first, the dragon – (they recognised it as a dragon as opposed to a dinosaur), then the stars, the butterfly and the 'wiggly bits' ( celtic knotwork ) at the bottom.


Chloe is curious about the swivel...


Keira thinks it's taking a long time.., after all she's already found time to walk away from three requested videos, coloured-in, done some 'Nanna-craft', i.e. colouring cutting and gluing crafts with Nanna, played with the dog and it's still not finished!


The carving of the Welsh Dragon in relief is now finished and I have begun work on the 'wiggly bit' of celtic knot work leading down to the stem of the spoon.


The celtic knot work portion is to be domed in section, both across the spoon and as it tapers toward the stem. the underside of this section will be hollowed out to to leave the curved stem of the spoon standing higher in the centre.


Before taking the stem of the spoon to its final shape I will commence work on the roughing out of the spoon's bowl because any heavy handling and carving needs to be done at the safest time of the carving process.


Saturday, February 25, 2012

Working on the Welsh Dragon Section


Work has now commenced on the Welsh Dragon relief on the front of the spoon. This has to be taken very carefully and slowly as any tear-out would be difficult to remedy because there is not much depth available to work into. When this section is complete the rest should be more straight forward.


I have planned to darken the background behind the dragon with a pyrographed texture. This should add an interesting contrast to the fairly white Timber of the spoon while the very white holly on the back will do the same.


There will not be a lot of extra carving on the back in a layered fashion just the reverse of the knot work and a few details on the spoon's stem.


When all the carving is complete and has been refined in parts then the sanding and finishing can be commenced. Until then there is still a fair bit of carving to do which should proceed a bit quicker after the dragon is complete.

Thursday, February 23, 2012

Working on 'Southern Cross - Welsh Lovespoon'


I have now commenced work on the commissioned spoon which I'm calling the 'Southern Cross Spoon' because it includes the Southern Cross from the Queensland flag. This spoon is being carved in Queensland white beech, a bit on the soft side for my liking, but it seems strong and holds detail well. I used this timber before for the 'dragon Lovespoon' last year but this time the timber is a bit less waxy and therefore might be a bit easier to finish.

The spoon has been roughed out on the scroll saw and I have begun to lay in some of the motifs on the upper surface above the ball and cage section. Normally I would do the tricky and riskier parts first, like the swivel and ball in cage, but I needed to discover where I could get access to the cage.


After the plan view is designed the depth of the carving requires designing on the fly as work proceeds, that is, it's a more intuitive way of working that's needed. So only careful progress will reveal each new step to be taken.


It is from behind the butterfly and stars and trail that best access can be had. So it is now apparent that the ball in cage will not be a straight forward matter, but rather a problem to be solved as we go.


Another design consideration will be the thickness of the stars and the butterfly. They will need to be thick enough, especially in short grain areas to be strong, but still appear thin and delicate.


The two balls in the cage have been completed now and they were particularly difficult to round off, due to lack of access. This lack of easy access meant that the balls, or irregular cubes as they were, had to be separated from the cage sides earlier than it would be wise to do so. This in turn meant that the shaping of these uncooperative lumps into spheres, with little means of holding them, was a bit of a task.


The 'path' or strip on which the butterfly is attached winds its way around the back of the spoon and again, due to the depth of the piece, there needed to be a way of incorporating it into a pleasing design around the back. I am endeavouring to keep the design as simple as possible through the depth of the spoon, unlike the heavily layered designs of some of my previous spoons. However I still want the back to be interesting, pleasing and relate to the front design. This means utilising the stars and path on the reverse side and reducing the apparent thickness of these elements without compromising their integrity when viewed from any angle.


To achieve this I have separated the path at the back into two overlapping star trails with particular care to follow fair curves that properly relate to one another viewed from any angle. I have likewise separated the front and back of the stars into pairs flared back into the path to avoid a blockish thickness in them.


In a similar way I have begun to separate both faces of the open heart at the top of the spoon containing the swivel with a shallow rebate on the broad side of the heart. This very slight addition will create interest and relieve the heaviness of the top heart as it will be read as two thin and elegant hearts instead of one big chunk of heart.


The challenge with the butterfly is to keep it as thick as possible but yet have it appear delicate, I will be working on this illusion as the work progresses but now that the riskiest parts are in place, the areas where breakage is a danger, I can turn to the task of rendering the welsh Dragon in very low relief on the medallion like background. This should also greatly simplify the design of the back of the spoon from here on in, as there will be no need to carve both sides of the dragon nor will it mean incorporating a difficult set of shapes on the back of the spoon. Instead I will have a clear area on the back to accept a shallow inlayed heart of holly on which an inscription can be engraved.


The 'Birds' lovespoon is on hold at the moment but I am hoping to complete it for an up-comming show. In the meantime I am pressing ahead with my illustration work most of each day and thinking about getting back to the botanical art course I'd begun, plus the doll's houses.

Sunday, January 29, 2012

Many 'Works in Progress' – Nothing Finished


Apart from finishing one version of the 'Young Dragon Hiding' Pyrography and seeing the article lay-out for the 2012 annual 'Pyrography Issue' of 'Scroll Saw' magazine. I seem to have been progressing slowly with a number of projects and acquiring new ones but not completing anything.

Most of my time is required to continue the picture book I am illustrating at the moment and schools have also now resumed after the holidays with scripture classes recommencing soon. Sometimes, ironically, regular routines can help you work more efficiently and so I hope to be able to post some completed items here before too long.

So here is the Lovespoon I am presently carving for a show in a couple of months. It is a little different in style from my previous lovespoons and has no Celtic elements in the design. I have a number of very different styles I want to try with lovespoons including some simpler ones to try and build up a bit of a stock.


This spoon is being carved from New South Wales Rosewood, a native Australian timber that is excellent for carving, a little like mahogany but a bit crumbly and dry in texture and not too strong in the short grain. It requires a great deal of care when carving the more delicate sections especially when they are essential to the design and need to have a presence without any discontinuance, like the ribbon threaded through the heart.


There is still a long way to go with this carving before I even get to the sanding and finishing.


In the meantime I have another commission that has to be started on soon, so that by working on it intermittently but consistently I will be able to complete it on time around Easter. It sounds like plenty of time doesn't it? But the problem is, the bulk of my current projects all need to be completed around this time and the others need to be well underway by then as well.

The other projects include some pyrography works and carving for the shows I regularly enter. One important project, on hold at the moment, is the pair of dolls houses I began before Christmas intended as part of the Christmas present for our two grand daughters to go with their 'Sylvannia Families' Dolls.


This pair of houses is designed to be fitted to a sloping base that will be the front yards of the houses. It will be like a small section of street with neighbouring houses meant for 'neighbouring play' to take place. I had thought, that as the deign was simple and deliberately toy like, then it would be a straight forward and easy build. This might be the case when I get around to drawing up the design again and constructing a second version that incorporates lessons learned along the way, but for now I will have to press on, designing as I go and realising, this is how it is with a prototype.

I have always intended to present many of my woodcrafts designs as step by step tutorial projects including patterns and plans. There is much involved in this however, much more than just making and documenting the process. The making just sets you up to commence the first set of credible working drawings, before making and documenting a final 'step by step' tutorial that is tried and tested.

I have also commenced ( last year ), a course on botanical art with Leonie Norton . Fortunately the course is open ended as far as time is concerned, as I have only finished the graphite pencil section of the course.


I am looking forward to getting into the watercolour painting part of the course. My illustration work, at least as far as colour is concerned has been only digital for more than a decade and a half and I am keen to use real materials again. The combination of art and science really appeals to me and also links to my distant past as a biological
( untrained, there were no courses then ) illustrator. This kind of work is also different in nature from the more whimsical and fanciful genres that I like so much but I feel that the two different strands of expression can only work well together.

Friday, September 23, 2011

Getting Back on Track Soon


Various circumstances, mostly not bad ones, have prevented me from keeping up to date with this tutorial and I do apologise for that to all who are following along. The main content of this blog and the pattern for 'young Dragon hiding' is to be published as a step by step magazine article by Fox Publishing in their next 'Pyrography Special Issue', under the banner of 'Scroll Saw Magazine'.  

This pyrography magazine had its inaugural issue published earlier this year. Consequent to this project being published I need to have the project completed, the article written and the accompanying photos prepared and annotated by the end of this month. This has meant that I had to start the project again in order to have photos of the process that are suitable for magazine production.

As explained earlier, this project has been experimental from the beginning and I have been feeling my way with it.  In my first attempt at re-starting the project I changed some aspects of it. The changes did not work out and I have had to start yet again with a return to the paint materials I'd suggested at the beginning. 

I have also now set up a more purpose made mini photo studio for taking the step by step photos and this should help with things in the future.    

Along with the need to prepare the  pyrography project for the magazine, I had a welsh lovespoon carving due for completion and this had to take priority over other projects. I'm happy to say the spoon has been completed and is on its way to its new owner.


The spoon is carved from an extremely hard timber called saffron heart. Hard to carve but a beautiful amber colour and it takes a good finish. The spoon is nine inches long and features a celtic style dragon between the chain link and the bowl.


Before getting properly back on track with this blog I will need to complete the material for the magazine article.  In the meantime I will post some of the photos I have of current progress with this project.  I will have to do this with little or no instructional text at this point but just hope you can make some sense of the photos as they stand.  I will a bit later re-jig this whole tutorial into a more logical form.

I have also made some changes to the original pattern in that I have included scales on the dragon body.  If anyone wants to have the new pattern with scales right away, then you can email me and I will gladly send you an updated pattern. Otherwise I will be placing the new pattern on my web site sometime next month. 


My manner of working on this project has been more intuitive than methodical in nature.  That is, I have tended to work on one section through to near completion, then move on to another area of the picture altogether and then perhaps to re-visit another area that has been already almost finished. 

Just briefly for those following, After the water colour paint has been applied and it's thoroughly dry, I have then used the pyrography tip with the flat portion downwards to firstly burnish or polish the area I'm going to work on.  This is done with a very low heat, low enough so that little or no tone is imparted to the work, just a 'glazed' polish leaving a surface so smooth that the pyrography tool slips smoothly over the surface. 

Keep the tip of the tool polished and polish the area you'll be working on. With the heat turned up just a little, just enough to gently tone the timber, start shading your work in a combination of short gliding strokes and sometimes little circles.  You will have to acquire a feel for this as you go and as you practice.  Think of it as painting the tone on in a layering process achieving darker tones by repeated passes and by lingering slightly in some areas.  Practice the technique on your scrap piece often and you will gradually gain confidence.  I will explain the technique I have used more fully when I write this Blog up properly later. 

The other technique is the use of coloured pencils to add the main colour to your work.  Experiment with different colours some will work better than others and I don't just mean the hue involved but their handling characteristics on the pyrographed timber surface.  the trick is, like using a very low heat on the pyrography tool, use very little pressure and lay down the pencil pigment without impressing the timber at all. Then after applying the coloured pencil polish the area with a tissue until the colour appears blended with the timber.  You can lay colour over colour this way and finally polish the whole area with the very low heated tip of the pyrography tool.

This is a brief run down of the technique I have used.  I will deal with the finer points later and in the meantime will add progress photos of the project as I go.